
Ever watched a roti puff up like a balloon and wondered why yours stay flat? You're definitely not alone. That signature puff isn’t just for show—it means your roti is turning soft and tender, just right for scooping up curry.
The secret is all about steam. Hot air gets trapped inside while cooking, forcing the two layers apart. Sounds basic, but one tiny misstep—overworking the dough, rolling too thin, or having the heat too low—and poof, no puff.
If your rotis look more like crackers than clouds, don’t worry. A few small changes can make them rise every time, and you don’t need fancy gear or rare ingredients. Let’s get into what really matters: fresh dough, the right rolling style, and a pan that’s sizzling hot. Ready to see the difference tonight?
- The Science Behind Puffing
- All About the Dough
- Rolling Techniques That Work
- Pan Heat: The Make-or-Break Factor
- Why Rotis Fail to Puff: Common Pitfalls
- Quick Fixes and Handy Hacks
The Science Behind Puffing
So, what really makes roti puff? The big secret is trapped steam. When you put rolled dough onto a hot pan, heat rushes in and starts cooking the outside right away. But inside, moisture turns to steam and pushes on the layers. That’s when you get that balloon effect.
Two things have to go right for this trick: the dough needs some air pockets, and the outside must cook fast enough to seal them in. If the dough’s too dry or you use cold water, no steam, no puff. On the flip side, if you roll it uneven or too thin, steam escapes before it does its job.
| Factor | Why It Matters |
|---|---|
| Dough Moisture | Helps create steam to puff the roti |
| Rolling Thickness | Even thickness gives steam a chance to spread; |
| Pan Heat | High heat seals the edges and holds steam in |
| Resting Time | Letting dough rest builds gluten for stretchiness (needed for puff) |
Here’s something you might not know: plenty of Indian kitchens don’t use baking powder or yeast for rotis. It’s all about the right combination of flour, water, and heat. If you nail that, puffed rotis happen naturally—no additives.
Want proof? Some Indian cooks clock pan temperatures up to 475°F (about 245°C). At this heat, the outside seals up in seconds and the moisture finds just one way out—by pushing the layers apart. That’s how you get the perfect roti puff every single time.
All About the Dough
The dough is where most roti problems start. If you get this part right, puffing up gets a lot easier. It's not just about mixing flour and water—little choices here can make or break your roti.
First off, use whole wheat flour (atta) because regular all-purpose flour won’t give you the same elasticity or flavor. Most folks use a ratio of about 1 cup flour to a half-cup water, but this can change with humidity or even the brand of flour. Aim for a soft, pliable dough—not sticky, but not dry and hard either. Kneading is key. At least 7 to 10 minutes by hand helps develop gluten, which gives you that bit of stretch needed for the roti to puff. If you rush this, the roti turns out dense and won’t trap steam inside.
After kneading, let the dough rest for 20-30 minutes. This relaxes the gluten, so rolling gets easier and the texture is softer. A quick cover with a damp towel keeps the dough from drying out.
- Use lukewarm water for mixing.
- Knead enough, but not so hard the dough tears.
- Add a teaspoon of oil if you want extra softness (not traditional, but totally works).
Here’s how little changes can affect things:
| Dough Factor | Impact on Roti Puff |
|---|---|
| Very dry dough | Roti cracks, won’t puff |
| Sticky/wet dough | Hard to roll, shapeless rotis |
| No resting time | Roti stays tough, less puff |
| Added oil/ghee | Softer rotis with better layers |
So, the next time someone asks you for your secret, tell them to start by nailing the dough. This is where a truly puffed roti begins!
Rolling Techniques That Work
If you’ve ever struggled with roti that won’t puff, chances are you’re making things harder than they need to be at the rolling stage. Getting this right is key to rotis that pop up on the pan, and it’s all about balance—not too thick, not too thin, and definitely not uneven.
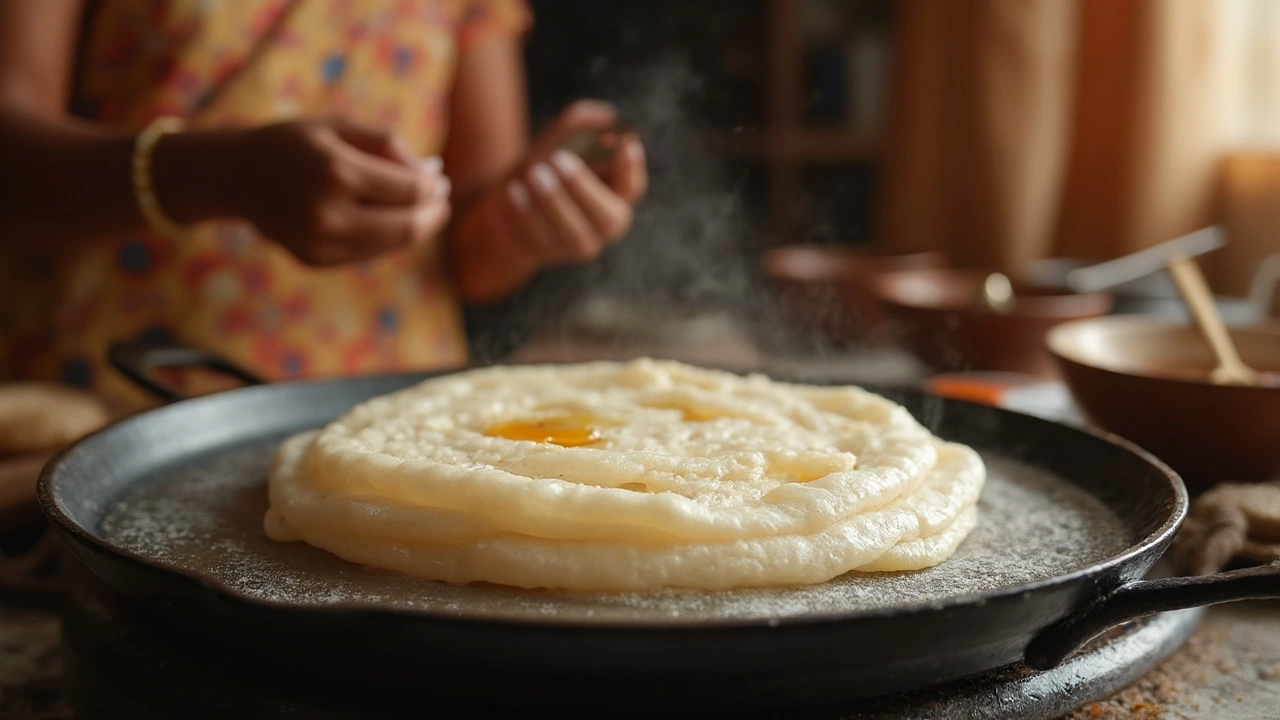
The ideal roti is about 2mm thick, evenly round, and smooth with no cracks at the edges. If it’s too thick in some spots or the edges are ragged, steam won’t build up well inside to create that signature puff.
- Always dust both your dough and rolling pin with a light sprinkle of dry flour. This keeps everything from sticking and helps you rotate the dough more smoothly.
- Press gently and roll from the center outwards. Let the rolling pin do most of the work, and avoid pushing down too hard—you want even pressure, so you don’t tear the dough or end up with thin spots.
- Keep rotating the dough after each pass with your pin. A quarter turn works best so you get a roti that’s as close to a circle as possible.
- If you notice cracks at the edges as you roll, pinch them together and gently smooth over. Cracks are steam leaks; they stop rotis from puffing up fully.
One trick experienced cooks swear by: after you roll one roti, as you set it aside to roll the next, let it rest for half a minute. This lets the gluten relax so it puffs up better when it hits the pan.
And don’t stress about perfection. Even if your rotis aren’t perfect circles, getting an even thickness is far more important. Focus on that, and you’re way more likely to achieve that roti puff you’re after.
Pan Heat: The Make-or-Break Factor
Here’s the real game-changer: if your pan isn’t hot enough, your roti won’t puff up—end of story. When people ask me why theirs are flat or hard, 90% of the time it’s because the tawa (griddle) wasn’t sizzling when the roti went on. Heat creates that steamy burst inside, making your roti balloon up quickly.
Before tossing on your next roti puff candidate, let the tawa preheat for at least five minutes over medium-high. To test, sprinkle a few drops of water on the surface; if they dance and evaporate fast, you’re good to go. If they sit and sizzle slowly, wait a bit longer.
The goal is to cook each side just long enough to set and brown, not dry it out. Try these steps for spot-on results:
- Once rolled, add the roti to the dry, hot pan (no oil, no butter yet).
- In 30-40 seconds, you should see bubbles form. Flip it fast—don’t wait too long or it’ll go stiff.
- Press gently with a cloth or spatula after the flip, helping the air spread and puff the layers.
- If you’re feeling bold, pop it right over the flame after the second flip for max puff. Use tongs and watch carefully—it happens in seconds.
Don’t lower the heat between rotis. Keep it steady so each one hits that perfect thermal shock needed for a good puff. If your edges dry out or darken too quick, the pan’s overheated—turn it down just a notch, and you’ll find your sweet spot with practice.
With the right pan heat, you’ll notice how each roti starts to swell like a mini balloon, with golden spots dotting the surface. That little glow of pride when it puffs? Totally worth it.
Why Rotis Fail to Puff: Common Pitfalls
If your roti isn’t puffing up, it’s not about luck—it’s about a few small mistakes that most people don’t even realize they’re making. Let’s break down what usually goes wrong so you can skip the flat, chewy results next time.
- Wrong dough consistency: Dry, stiff dough won’t let steam build up, so your roti stays flat. The dough should be soft but not sticky—you should be able to press a finger into it and see it spring back a little.
- Not enough resting time: Skipping the dough’s rest means gluten isn’t relaxing. This leads to tight rotis that resist puffing. Even just 10-15 minutes can make a big difference.
- Uneven rolling: Thick in the middle and thin on the sides? That kills the puff. Roll your roti as evenly as you can—no lumpy spots. If the edges are thick, steam escapes, and there’s no balloon effect.
- Low pan temperature: If your tawa (pan) isn’t hot enough, the steam won’t rush in to separate the layers. The roti puff doesn’t happen. A small flick of water on the pan should instantly sizzle and evaporate.
- Overcooking or undercooking the first side: Rotis need about 30 seconds on the first side; too long, and they get rigid, too short, and they won’t cook evenly.
- Not pressing the roti: Sometimes, a little help with a kitchen towel or spatula on the edges helps the puff start. If you skip this, the roti may only swell in spots or not at all.
- Old flour: If your whole wheat flour has been sitting around too long, it just won’t give you the same soft results. Fresh flour really does matter.
Here’s a quick table comparing mistakes and effects:
| Mistake | Result |
|---|---|
| Dry dough | Roti turns out hard, no puff |
| Skipping rest | Tough texture, stays flat |
| Uneven rolling | Partial puff or none at all |
| Low heat | No quick steam—flat roti |
| Old flour | Chewy, dense roti |
Spot these troublemakers, and your next batch will finally rise to the occasion. Tiny habits, big difference.
Quick Fixes and Handy Hacks
If your roti isn’t puffing up, sometimes it just takes a tweak here or a quick trick there. First up—don’t panic. Even kitchen pros mess this up from time to time. Most of the time, your fix is hiding in plain sight.
- Check your dough’s moisture. Too dry and the layers won’t separate when cooking. If the dough feels stiff, knead in a teaspoon of warm water until you get something soft and a little sticky. Rest it for 10-15 minutes to help it relax.
- Warm hands help. Cold dough from the fridge rarely puffs, so bring it to room temp before rolling. Your hands actually add a bit of warmth when kneading, which helps with elasticity.
- If you see bubbles forming but no big puff, press gently with a clean towel or a spatula on the edges of the roti while it’s on the pan. This helps trap steam where you want it most.
- Try a direct flame hack: If you’ve got a gas burner, finish the roti by placing it with tongs directly on the flame for a few seconds. You’ll almost always get a balloon pop. Don’t walk away—burnt roti isn’t fun.
- With thicker rolling, aim for about 2mm—not paper-thin, not chunky. Uneven rolling is a big reason behind no puff. If you’re seeing thick parts, focus on balancing out the edges.
- Clean your pan between rotis. Bits of burnt flour mess with even cooking and can sap your heat. Just wipe with a dry paper towel quickly.
One more thing: if your roti is puffing in one spot only, your heat’s probably too low or your dough wasn’t even. Turn up the heat, and try again with a fresh ball. Getting a roti puff consistently takes a few rounds, but once you’ve nailed it, it’s hard to accept anything less!